Many of us are stuck at home right now and I wanted to share a few ideas to help pass the time. These have all been published in previous eBooks but I thought I would share them again.

Rain-X
What is Rain-X and how can you use it to create some interesting images for macro photography?
Rain-X is a glass cleaner that repels water when applied to a glass surface. Most folks use it on their car windshields to bead the water. I use it to create fun images of water droplets that contain refracted image of a flower within.
I first tried this technique several years ago and while I like the look of some of the images I still find it to be a bit of a novelty BUT still a lot of fun to play around with on a rainy day. You never know what you’ll come up with!
Equipment
First of all you will need a rectangular sheet of clear glass, two side supports to hold the glass up off of the floor approximately one foot, spray bottle filled with water, flower/flowers, small vase (you don’t want the vase to show up in your images -so the smaller the better) and camera gear.
Setup
The setup is easy; position the supports to hold the glass. I use buckets since they are light weight and inexpensive. Place the glass on top of the buckets, with the buckets on each side of the long edge of the glass. On the clear glass spray the Rain-X and allow it to dry, After the Rain-X dries use a spray bottle filled with tap water and spray water on top of the glass. The water will bead up and create several water drops. Be careful not to spray too much as the water drops will run together forming one giant water drop instead of several small drops. Place the vase approximately 6 inches underneath the center of the glass and put your flower/flowers in the vase. Next put your camera and macro lens on a tripod and set it up so that it is parallel to the glass.
Being parallel to the glass will put all of the drops on the same plane of focus allowing for greater depth of field. I like to use an aperture of f/8 for this type of set-up for macro photography. If you use a wide aperture many of the drops will not be in focus. If you stop down too much then the flower/flowers that you placed under the glass will appear much more in focus and become a distraction. The image of the flower or flowers that you placed below the glass will be refracted by each water droplet.
Lightpad Photography
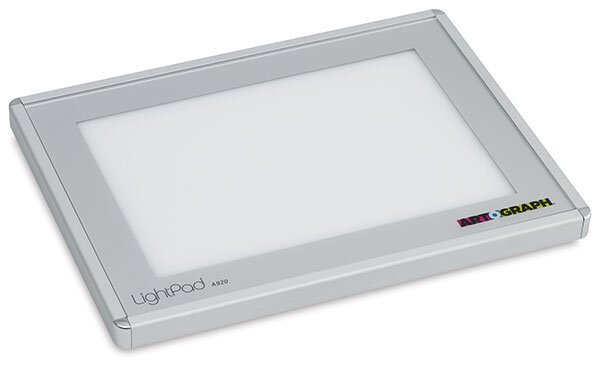
A great way to illuminate a subject from behind is to use a lightpad. A lightpad is essentially a light box; if you have a lightbox from the film days it will work too. There are many different models of lightpads on the market though I do prefer the 12” X 9” ArtOGraph Lightpad that is illustrated above to both an old light box and to other models of lightpads. Why? The quality of the light is better. Some models of lightpads have dim, uneven lighting with a yellow color cast. When using a lightpad I often rely on reflectors to illuminate the subject from above. Flash or other lighting can be used as well.
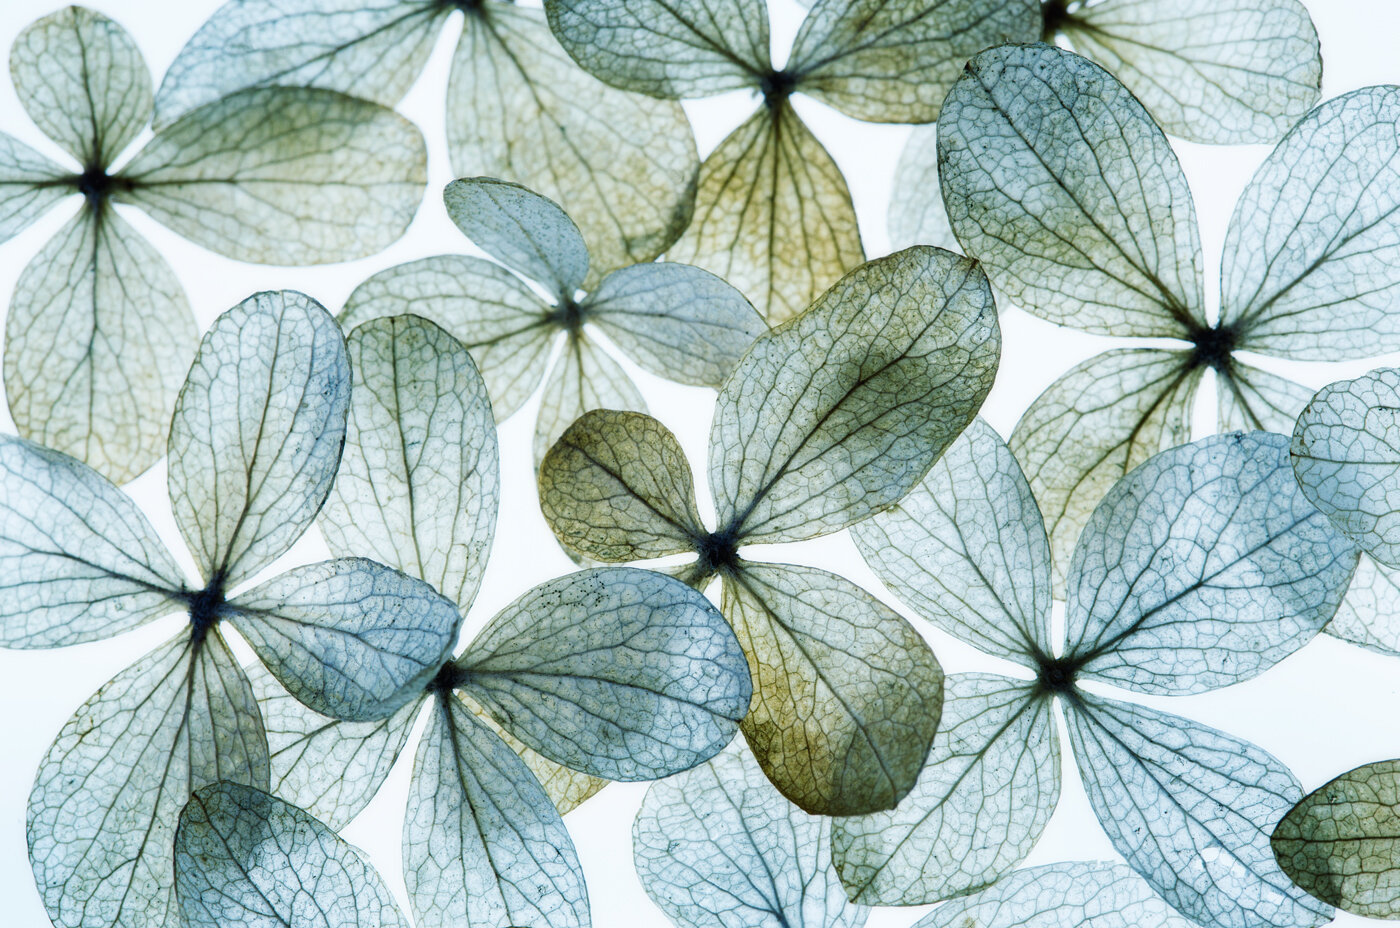
To create the Hydrangea image above I started with an older flower blossom and took each delicate petal off of the stem and placed them onto the lightpad; I didn't spend a lot of time placing them as I didn't want the image design to look too contrived. Next I chose an aperture of f/13 and used mirror lock-up and a remote release. Wanting to create a very high-key look I exposed to the far right of the histogram while checking carefully not to get any blinkies (highlight alerts) on my petals of the flower. Lots of blinkies on the background are fine so that the background would be rendered bright white. I was set up carefully on a tripod while making sure that the plane of the Hydrangea petals and the plane of the lightpad were parallel to the plane of the camera’s sensor. Doing so ensures creating an image that will be sharp from edge to edge. The image was processed using Nik Color Efex Pro’s Cross Balance Filter-Tungsten to Daylight at a reduced opacity.
Blank Canvas Twirl

To create the image above, I began with a blank canvas. You could, however, begin with a traditional image and skip the first paragraph below.
If you’d like to experiment or practice with a blank canvas hit File > New. Set the width and height to 400 pixels each with Background Contents set to a White. Now to go to Filter > Render > Clouds and then to Filter > Pixelate > Mezzotint (with Type set to Short Lines) and then hit OK. Now hit Filter > Blur > Radial Blur with the Amount set to 100 and the Blur Method set to Zoom. Then hit Crtl F to repeat this step.
Now duplicate the image twice (Ctrl J, Ctrl J). While working on the top layer (Layer 1 copy) go to Filter > Distort > Twirl and set the angle to +75%. On the bottom layer do the same thing except move the slider in the opposite direction to -75%. Now set Blending mode for the top layer to Lighten. You can then colorize each layer
individually by going to Image > Adjustments > Hue/Saturation.When each dialogue opens be sure to check “colorize” if you started with a blank canvas. Now tweak the colors of each level to taste.