The difference between a good or bad image often depends on the lighting. Poor lighting or insufficient lighting can affect the overall appeal of the final image. There are many techniques that are used by photographers to utilize the ambient light to their advantage; One of the most versatile, inexpensive and convenient ways is with the use of light reflectors and diffusers. From now on, I will refer to both as simply reflectors.
Reflectors do exactly what they say they do, they reflect light and are used to control and manipulate the light source. The most obvious place to try out a reflector is outside but they are also used for indoor shooting. One way that I like to use reflectors is when the available light is from the side. This helps to add light to shadowed areas or to even out the available lighting. Available light or ambient light usually refers to any natural light source. Another use for reflectors would be to diffuse or soften harsh light. I also use the reflectors to shade flowers when the light is too harsh. I prefer to photograph my flowers with natural light and using a reflectors is a great way to harness or control the sunlight.
I am always set up on a tripod when using a reflector and I use my camera’s timer or a remote. You can purchase things to hold the reflectors in place but I prefer to hand hold them so that I can move them around freely.
Make sure that when you are positioning your reflector that it is actually reflecting the light where you want it. It is important to experiment with the positioning until you get the desired lighting; sometimes this is best seen when looking through your camera—especially if the difference is subtle. When using a diffuser to soften the light-it needs to be positioned between your subject and your light source. Your goal is to have nice controlled lighting on your subject, preferably without harsh shadows.
Don't get caught with the wrong reflector. An oversized reflector in a crowded area is a recipe for disaster. You will end up hitting someone or something. I use small 12” inch reflectors that fit in my pocket when not in use. They work perfectly for close-up flower photography in tight spaces or public gardens.
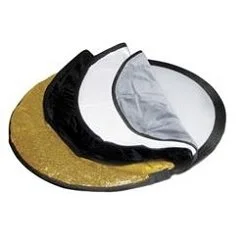
I also like the reflector kits that have five reflectors inside. These kits usually contain an assortment of the most popular collapsible reflectors such as: gold, sunlight, silver, white, and translucent. These larger reflectors are great when photographing fields of flowers, open spaces or studio work at home. Below are some explanations to the different types of reflectors in these kits.
I use the ProMaster 32" Collapsible Reflector - 5 in 1 Plus (shown below). I use the ProMaster 12” smaller reflectors also.
White Opaque - Produces an even, neutral-colored reflected light that works as a fill light. Can be used both indoors and outdoors.
Silver - Silver increases the highlights with a bright and whiter reflection which creates a higher contrast look. I like to use this for cooler toned flowers.
Gold – Works the same as the silver filter but with a warming tone that is more subtle. Recommended use is outdoors with very early or late sunlight.
White Translucent aka a diffuser- Softens harsh light sources. I like to use a combo of a soft diffuser and a reflector at the same time, holding the diffuser between my subject and the light source-then using a reflector to reflect light where I want it (usually in the center of the flower).
Black – Does the opposite of reflect, it absorbs light. Black can also be used to shade flowers when the light is too harsh.


