• Home
  • Blog
  • Workshops
  • eBooks
  • Events
  • Galleries
  • My Gear
    • Denise Ippolito
    • Paul McKenzie
    • Donna Bourdon
    • Harold Klein
    • FAQ's
    • Policy Page
    • Testimonials
    • Registration Form
    • Contact
    • Visualization
    • PRINTS
    • Jaxson's Journey
    • Stamp Collections
    • Archives
    • Custom African Safaris
Menu

A CREATIVE ADVENTURE photography by denise ippolito

  • Home
  • Blog
  • Workshops
  • eBooks
  • Events
  • Galleries
  • My Gear
  • The Team
    • Denise Ippolito
    • Paul McKenzie
    • Donna Bourdon
    • Harold Klein
  • More
    • FAQ's
    • Policy Page
    • Testimonials
    • Registration Form
    • Contact
    • Visualization
    • PRINTS
    • Jaxson's Journey
    • Stamp Collections
    • Archives
    • Custom African Safaris

Combination of a diffuser and a reflector to control the natural light.

Reflectors and Diffusers for Flowers

July 16, 2025

The difference between a good or bad image often depends on the lighting. Poor lighting or insufficient lighting can affect the overall appeal of the final image. There are many techniques that are used by photographers to utilize the ambient light to their advantage; One of the most versatile, inexpensive and convenient ways is with the use of light reflectors and diffusers. From now on, I will refer to both as simply reflectors.

Reflectors do exactly what they say they do, they reflect light and are used to control and manipulate the light source. The most obvious place to try out a reflector is outside but they are also used for indoor shooting. One way that I like to use reflectors is when the available light is from the side. This helps to add light to shadowed areas or to even out the available lighting. Available light or ambient light usually refers to any natural light source. Another use for reflectors would be to diffuse or soften harsh light.  I also use the reflectors to shade flowers when the light is too harsh. I prefer to photograph my flowers with natural light and using a reflectors is a great way to harness or control the sunlight.

I am always set up on a tripod when using a reflector and I use my camera’s timer or a remote. You can purchase things to hold the reflectors in place but I prefer to hand hold them so that I can move them around freely.

Make sure that when you are positioning your reflector that it is actually reflecting the light where you want it. It is important to experiment with the positioning until you get the desired lighting; sometimes this is best seen when looking through your camera—especially if the difference is subtle. When using a diffuser to soften the light-it needs to be positioned between your subject and your light source. Your goal is to have nice controlled lighting on your subject, preferably without harsh shadows.

Don't get caught with the wrong reflector.  An oversized reflector in a crowded area is a recipe for disaster. You will end up hitting someone or something. I use small 12” inch reflectors that fit in my pocket when not in use. They work perfectly for close-up flower photography in tight spaces or public gardens.

I also like the reflector kits that have five reflectors inside. These kits usually contain an assortment of the most popular collapsible reflectors such as: gold, sunlight, silver, white, and translucent.  These larger reflectors are great when photographing fields of flowers, open spaces or studio work at home. Below are some explanations to the different types of reflectors in these kits.

I use the ProMaster 32" Collapsible Reflector - 5 in 1 Plus (shown below). I use the ProMaster 12” smaller reflectors also.

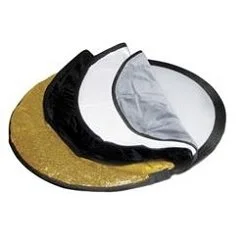
White Opaque - Produces an even, neutral-colored reflected light that works as a fill light. Can be used both indoors and outdoors.

Silver - Silver increases the highlights with a bright and whiter reflection which creates a higher contrast look. I like to use this for cooler toned flowers.

Gold – Works the same as the silver filter but with a warming tone that is more subtle.  Recommended use is outdoors with very early or late sunlight.

White Translucent aka a diffuser- Softens harsh light sources. I like to use a combo of a soft diffuser and a reflector at the same time, holding the diffuser between my subject and the light source-then using a reflector to reflect light where I want it (usually in the center of the flower).

Black – Does the opposite of reflect, it absorbs light. Black can also be used to shade flowers when the light is too harsh.

Follow me on Facebook for more content.

Subscribe

Sign up with your email address to receive news and updates.

We respect your privacy.

Thank you!
2 Comments

It's All Over Now, Baby Blue

July 14, 2025

It's All Over Now, Baby Blue, Bob Dylan - 1965

Though I was too young to really appreciate Bob Dylan and the times that he reflects in his songwriting. I have grown a deep appreciation for his song writing skills since the release of the movie titled "A Complete Unknown," starring Timothée Chalamet, who actually sang for the film. He even learned how to play guitar and harmonica, just for the role. I felt his performance was outstanding, especially given the acting, singing, and instrumentals.

But again, I never really was into the music or life of Bob Dylan. It is only since the film, that I can not get his music and lyrics out of my head. Dylan earned a Nobel Prize in Literature for his songwriting (I never knew that either). Digging into some of his hits and obscure songs, I felt a big connection to many of his songs. Many of his songs are more about the way he sings the lyrics, than just the lyrics—but it is kind-of haunting, the way his voice goes up and down to add punctuation.

I liked this version of him singing live, I feel live performances always show the true artist better. It’s raw and unpolished… Bob Dylan - It's All Over Now, Baby Blue (Live at the Newport Folk Festival, 1965). In the movie it is clear, that Dylan is a true artist not willing to compromise his music for anyone—not even for the people he was most fond of. I think as artists in any field, we can relate to that. His album following that concert has been described as one of Dylan's best works…good for you Bob Dylan.

I think the take-away here for me, is that you need to believe in yourself and your art and push forward against the naysayers. The same is true with photography or any form of art. Maybe that is why the movie touched me so deeply.

PS- I watched the movie 3x

Lyrics-

Well, you must leave now, take what you need, you think will last
Buy whatever you wish to keep, you better grab it fast
Yonder stands your orphan with his gun
Crying like a fire in the sun
Look out, the saints are comin' through
And it's all over now, baby blue

What a highway is for gamblers, better use your sense
Take what you have gathered from coincidence
The empty-handed painter from your streets
Is drawing crazy patterns on your sheets
This sky too is folding over you
Yes, and it's all over now, baby blue

All your seasick sailors, they are rowing home
All your reindeer armies are all going home
The lover who has just walked out your door
Has taken all his blankets from the floor
The carpet too is moving under you
Yes, and it's all over now, baby blue

Leave your stepping stones behind, something calls for you
Forget the dead you left, they will not follow you
The vagabond who's rapping at your door
Is standing in the clothes that you once wore
Strike another match, go start anew
Yes, and it's all over now, baby blue

Two of my other favorites- Girl from the North Country and It Ain't Me Babe

Subscribe

Sign up with your email address to receive news and updates.

We respect your privacy.

Thank you!
8 Comments

Grimsey Island, Iceland -Trip Report

July 11, 2025

I am heading home from Grimsey Island off the north coast of Iceland. It is a very popular breeding spot for Atlantic puffin and other seabirds. I mainly chose to start doing workshops on Grimsey because:

I absolutely love puffins and the UK (Farne Islands, where I used to run puffin workshops) kind of fizzled out in terms of photography after Covid and then being hit hard with avian flu. The boats changed their landing times and the shortened time on the islands didn't work for me. 

The light on Grimsey can be amazing in the evenings, not to mention the midnight sun and all the opportunities it brings.

The island offers several different areas to photograph at. There is a large pond that is generally filled with terns, ducks and shorebirds, there is a beach area that has lots of Oystercatchers on rocks, phalaropes, godwit, plovers and such, there are basalt columns that add an interesting element to your photos, a lighthouse with Northern fulmar nesting near the cliffs, the harbor area is a great place to photograph Black guillemot, Arctic terns, Common eiders and more. Not to mention the thousands of puffins, razorbills and guillemot on the cliffs. 

You can walk freely about. There are no restricted paths or time limits to hinder photography. But, you must always be respectful of the wildlife and be careful not to stand in front of -or trample any burrows. Also, if you are photographing in one spot near where the puffins burrow it is a good idea to rotate your position frequently in case you are inadvertently too close to a burrow. Tiny tern chicks can line the roads, so drive slowly and carefully. 

Grimsey is a close knit community with a small grocery store (really small), gift shop, food truck( they sell cod dogs), bar/ restaurant where you will find that the fish of the day is always a good choice. Donna and I really like the owners and their staff, they have made us feel most welcomed. Our host is also a gem, we love her!  

When everyone else is fighting hot summer heat, Grimsey is pretty cool at around 50 degrees Fahrenheit on average. 

Overall Grimsey has won my vote for one of the best places to photograph puffins. 

On this trip Donna Bourdon was co-leading but moving forward Donna and I will rotate years. Next year my trip is “sold out” but we just listed Donna’s 2027 trip if you are interested in joining her.

We had pretty good weather during our trip. The locals were sun bathing because it had been overcast with rain for weeks before we arrived. With light all day and night it’s hard to decide when to shoot and when to rest. I know that you’re thinking poor us! There were lots of whales just off the coast, they were fun to listen to and watch.

Overall we had a fantastic trip. It always makes me feel good when everyone leaves the workshop with great memories and photos to share. 

These are a few of my favorites from the trip. CLICK ONTHE PHOTO TO SEE THE LARGER IMAGE

View fullsize DSC00035-Edit.jpg
View fullsize DSC00272-Edit.jpg
View fullsize DSC00527-Edit.jpg
View fullsize Golden plover
View fullsize DSC00555-Edit.jpg
View fullsize DSC02130-Edit.jpg
View fullsize DSC00578-Edit.jpg
View fullsize Golden plover chick
View fullsize DSC01505-Edit.jpg
View fullsize Icelandic horse
View fullsize Common Redshank
View fullsize DSC01628-Edit.jpg
View fullsize Northern fulmar
View fullsize Razorbills
View fullsize DSC02093-Edit.jpg
View fullsize DSC02270-Edit.jpg
View fullsize Black Guillemot
View fullsize Arctic tern
View fullsize DSC02200-Edit-Edit.jpg
View fullsize DSC02487-Edit.jpg
View fullsize DSC02612-Edit-Edit.jpg

Subscribe

Sign up with your email address to receive news and updates.

We respect your privacy.

Thank you!
14 Comments

B&W Conversions

July 1, 2025

On one of my recent workshops, I shared my post-processing for B&W conversions, I was going to send my client a re-cap of the steps but decided to write them down here for all of you.

The above image was processed in Photoshop, the conversion was not done in Nik, I prefer to convert my B&W images on my own.

In many cameras today there are many different Picture Styles to choose from. I like to put my camera on Monochrome I do this in the field only when working in RAW mode. It is a good way to determine if a B&W conversion will work for your selected image. Because I am working in RAW when I convert in Lightroom/ACR my image will automatically go back to color. I am only using this feature in the field as a guide. Again, I am working with a RAW capture.

Several factors will influence my decision to go with a B&W image. The first is contrast. If the light is bright my words to my groups are often; when the light is not right- think tight or think B&W. Why, because working tight will often times allow you to control the light. Why B&W, contrast. Contrast is the key to dramatic B&W images. So the next time you are out and the light seems a bit bright-try this tip.  I also consider the sky an important element, if it is a dramatic sky I often think about a B&W scene.

And now for the fun part, the processing. I consider a B&W conversion an art form of its own. There are many plug-ins that will do the conversion for you but often times you are left with very noisy images. In the above image I did not need to apply any noise reduction, because I controlled each step of the conversion myself.

I start my processing my image in Lightroom/ACR first. I make adjustments to the WB, I adjust my exposure-if needed. I adjust the clarity, open up my shadows a touch, tone down my highlights and/or whatever other tweaks I need to do to prepare my image as I would with any other image before bringing it into Photoshop.

Once in Photoshop I duplicate my layer. Next I go to Image> Adjustments > B&W. For a dramatic effect like above I usually select the High Contrast Red Filter from the preset dropdown menu (I use this just as a guide). Then I selectively go into each color channel and move the sliders until I am happy with the look. 

Now, I do not know the image you will be working on and I can't advise you specifically but I can tell you that if you scroll through the dropdown presets and find one that you like and use it as a starting point you can then fine tune each channel. You will most likely end up with a nice base B&W image that can be further tweaked.

Depending on the outcome sometimes I will duplicate my layer and go to Image> Adjustments> Equalize for a little more punch. I often times increase the brightness, use your judgement. I like to go into Selective Color and adjust the Neutrals. To do so go to Image> Adjustments> Selective Color, once inside the dialogue box I will select Neutrals from the colors dropdown. Then slide the black channel to the right until you are happy with the look. I also use Auto Tone and/or Auto Contrast at approximately 20%. Auto Tone and Auto Contrast are hideous at 100% (most of the time) so be judicious. The most important thing to remember is to make small adjustments on layers and reduce the opacity or use a layer mask to control each adjustment. I suggest trying to do your own B&W conversions. You may be surprised at how good you are at creating your own B&W images.

*The above image was captured in the Palouse, many years ago. I don’t think the building is still there, the last time I was there it had fallen over.

Subscribe

Sign up with your email address to receive news and updates.

We respect your privacy.

Thank you!
Comment

Mara, Amboseli, Samburu- Trip Report

June 28, 2025

I just returned home from another amazing safari in Kenya with private clients. A big shout out to Donna Bourdon who co- led this private safari with me, the clients benefited greatly.

My clients met up with us in Nairobi. After a long flight (I booked Newark> Brussels> Nairobi thru United) with a few delays I ended up making it to Nairobi on schedule. The pilots really can make up some time in the air. I never transferred through Brussels before, the line for the transfer terminal was ridiculously long. Probably not going thru Brussels again…

Our first stop on this Mara/Amboseli/Samburu private safari was Amboseli. The clients wanted to visit Amboseli for the large tuskers. The first day we arrived, we saw Craig (the giant Tucker, age 53) he was alone, and our group had him all to ourselves. In addition to Craig, we saw 2 other big tuskers. Needless to say, Amboseli was a big hit with everyone.

Our next stop was Samburu. I love Samburu for the change of terrain from the Mara but also because it is less crowded and you have most of the sightings all to yourself. If you go when it’s their dry season you can have great opportunities for backlit dust shots. This was not their hot season and the weather was delightful. 

Unfortunately we didn’t have great light for this shot. But the shot does show the coloration difference between the cubs and the adult female.

Within minutes of landing on the small airstrip in Samburu our guide spotted a leopard with a three-month-old cub; it turns out this leopard actually had 2 young cubs. It was amazing how our Maasai guide zeroed in on where the monkeys were alerting. He quickly spotted the leopard and then the cub. We had the sighting all to ourselves, but the light was bright and the vegetation in that area was a hindrance. Still, it was a great sighting. 

Later the next day we found the leopard again, this time with both of her cubs. On our final night we spotted the leopard going up a tree to take a brief nap. While she got herself comfortable, she continually made a barking noise to alert other leopards that this was her territory. The sun was starting to set, the background was lovely, and her chosen branch/perch was beautiful. All the makings for a great photo. And then out of nowhere she stood up and leapt to a higher position. My client Glenn got the ultimate shot with all four paws in mid-air, and he didn’t clip the tail!

I loved seeing her legs straddle the branch.

During our time in Samburu, we also saw a lioness up a tree, she was sitting down when our guide spotted her. As we waited, hoping she would climb down or jump—she did a big cat stretch for us!!

We also saw each of the special 5 species (Beisa oryx; reticulated giraffe; Somali ostrich; Grevy's zebra and Gerenuk). I was especially happy with one of my abstract shots of three Grevy’s zebra.

Grevy’s zebra abstract, the one in the back is covered in dust.

Vulturine Guinea Fowl abstract.

Vulturine Guinea Fowl in-camera blur

One of my absolute favorite species to see in Samburu are the Vulturine Guinea Fowl. They make great subjects for abstracts and in-camera blurs. Their bright blue colors are striking. Plus, they are hysterical to watch as they flutter around. 

Our upscale camp was loved by all. Each room had a private plunge pool that sparkled like a bag of diamonds. The food was fantastic with a wide variety of scrumptious dishes, including vegetarian offerings. 

Our last and final destination was the Maasai Mara. Of course, the Mara does not disappoint. One of the group’s favorite sightings was a male lion, but not just any male lion. This one was so beautiful with a large, black, flowing mane glowing in the early morning light (opening image). I had to decrease the vibrancy a bit in post- processing to tone down the golden hues.

One morning before the sun came up, we spotted three Bat-eared fox; they were too skittish to sit and watch and/or photograph, but we did get a few fleeting shots of them. We also photographed a lot of birds during this trip. One of the clients enjoys shooting birds, so we made a point of stopping for as many as he wanted. 

Yellow-necked Spurfowl in late afternoon sun doing a shake-off to rid itself of dust.

Here is another shot of the Yellow-necked Spurfowl, but here you can see how it gets its name.

Secretarybird

Grey crowned cranes

There was a controlled burn with lots of smoke in a section far away from us, but we could see the smoke against the sky. As the sun set, the smoke looked like a fire in the sky! We played around with silhouettes, and I got a few shots I loved. 

On our last morning drive, before saying our goodbyes, we spotted a male cheetah sitting on a mound. The warm morning light added to the photos. It didn’t hurt that our cheetah was a poser. It was a wonderful send off for the group. 

Overall, the trip was a great success. Everyone got a wide variety of photographs and memories. I’ll see Donna in Iceland as we start our Grimsey trip in a few days. 

*For all the photos in this post I used a Sony a9II, Sony 200-600mm lens (my favorite Safari lens) and my Sony 12-24mm lens. All handheld with natural light. All processed using Lightroom and/or Photoshop. I have a lot more images to sort through, so I’ll post more later. 

Vervet monkey showing his goods.

I love the grasses the cheetah is walking in.

Subscribe

Sign up with your email address to receive news and updates.

We respect your privacy.

Thank you!
8 Comments
← Newer Posts Older Posts →

Welcome to my WEBSITE…

This is the place where my love for nature, art and photography blend together as one.

Subscribe

Sign up with your email address to receive my latest tour info, tips and techniques.

Thank you!
Custom African Safaris

My eBooks:

Softer-Side-of-Macro.jpg
The-Art-of-Abstract-Photography
Creative Art of Phtography.jpg
Bloomin'-Ideas-updated.jpg
Untitled-1 (10).jpg
Guide-to-Creative-Blurs (2).jpg
Visual-Expressions.jpg
Gift-Certificate-.jpg

GIFT CERTIFICATES

Custom Prints

CUSTOM PRINTS

Forever Stamp Collections

FOREVER STAMP COLLECTIONS

JAXSON'S JOURNEY

Jaxson’s Journey

Photo Galleries:

Aerial

Alaska

African Safari

Avian

Badlands, South Dakota

Bird Island, Seychelles

Bolivia

Bosque del Apache

Bryce & Zion

Camargue, France

Charleston So. Carolina

China

Death Valley

Dolomites

Falkland Islands

Favorites

Florida

Flowers

Galapagos

Grimsey Island

Greece

Holland

Iceland

Japan

Japan Snow Monkeys

Mongolia

Namibia

New York & New Jersey

Nickerson Beach

Norway

Olympic Peninsula

Oregon Coast

Out West

Palouse Region

Patagonia

UK Puffins & Gannets

South Georgia Island

Venice, Italy

Vietnam

Yellowstone


SPONSORS:

B&H.png
imagemakers-header.jpg
prana.jpg
dickies_com_logo_172x96_v1_m56577569830516936.png
grayscale10stepX.jpg

Subscribe

Be the first to know about new content, upcoming workshops, special events and more…

I completely respect your privacy.

Thank you!

Follow me on Facebook